How to Draw a Tree Bark Texture

No one taught me how to draw texture, I discovered it by trial and error. Back in the day, there were no online lessons, only books, and most were useless. It's not much better now, and that's why this post will help you get results faster.
Drawing texture is easier using B-grade pencils on grainy paper. Use erasers to lift-out textures by dabbing. Sketch fur and hair in the direction of growth and use your eraser to swipe the highlights.
There is a lot to cover and this post is an overview of techniques to get you started. As with everything else to do with drawing, nothing beats practice. So with that in mind let's get going.
(I get commissions for purchases made through links in this post. However, I only promote products I like and recommend)
1. How to Draw the Texture of Rock
If you want to show off and amaze people with your skill, there is nothing easier than drawing rocks and stones. It's so easy to draw texture, it's almost cheating.
It was while I was playing around with graphite stumps and Blu Tack (affiliate links) that I realized the potential to make up rock texture without ever having to copy it.

Here's a case in point. This leopard was in the Singapore Zoo and that rock was actually concrete. The form and shapes were easy enough to draw. There are only three simple blocks with some basic shadows on the left. The light is coming from the right.
I shaded the rocks initially using a 0.3mm HB Pentel Mechanical Pencil (affiliate). If I had used a 0.5 or 0.7mm the grain would've been much coarser. I wanted a gentler texture so 0.3mm was fine. I didn't attempt to draw detail at this stage.
If you need help with pencil grades read: What Do Pencil Numbers Mean? Pencil Grades Explained + Charts
When everything was blocked in I took a small ball of clean Blu Tack (affiliate) and rolled it at random across the bottom left. The graphite lifted off in a patchy pattern.
I refined the patches by redrawing the lost shadows and adding darker edges. Now the blotches stood out as slightly raised from the base. I could envisage some natural-looking cracks and fissures and I exaggerated them for a 3-D effect.
It's all serendipity. I made marks and capitalized on the random outcome. It could've gone wrong, in which case I'd have shaded over the mistake and tried again. Nothing lost.
Having got the bold light and cracks looking good, I pressed a point of Blu Tack (affiliate) onto the paper to create further texture. You can see how I lifted more on the right side of the leopard.
I picked out any anomalies in the paper where the grain looked interesting and dabbed out the lighter patches. These small raised patches look very real. I could raise or soften them at will with shading.
The cracks look real because the darks are bordered by lighter edges. Look closely at the central slab, the crack on the left has a light reflection along the edge. That makes the rock look much more rounded.
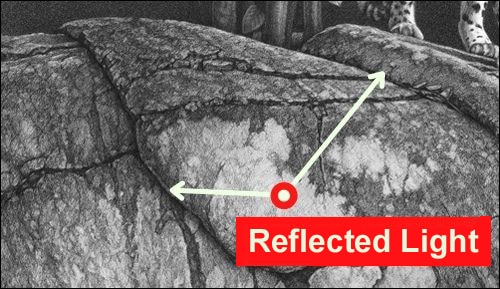
The rock on the top right just below the leopard is shaded lighter in the middle and darker on the ridge. It's a soft and uneven transition. a more solid shadow would look less convincing.
There is another way of drawing rock texture or boulders.
Draw a boulder shape and determine the direction of the light. Now take a 6B graphite stump (affiliate) and drag it randomly across the surface, twisting it as you do so. You will create very grainy speckled spots and rings.
Join some of the spots and rings with a sharp 3B and strengthen some patches with some shadow. Before you know it, you'll have an insane amount of detail that looks like it took forever, but in fact, it took minutes.
If you are still a beginner I think you'll benefit from this class by Brent Eviston on Skillshare (affiliate).
2. How to Draw the Texture of Tree Bark
I draw bark texture in a similar way to rock but with more finesse. It is all about lifting off texture with Blu Tack or a Kneadable Eraser (affiliate links)
This leopard cub in a tree is a good example of bark that was drawn with good technique rather than trying to copy it exactly.

The bark on the tree trunk is a series of random elongated shapes following the line of the tree. I didn't try to copy them, there was no need, all I had to do is create the same impression.
I shaded the tree with a 0.3mm B grade mechanical pencil and darkened both sides. The light is coming from behind the viewer.
Then using a Tombo Mono Eraser Pen (affiliate) I dragged it down the trunk in random crossing broken lines. The bark shapes in the middle are wider than those on the sides. It's a subtle gesture and gives the illusion of a curve in the trunk.
I had to be careful because I wanted to retain the crispness of the bark texture. I didn't want to lose the speckled grain by smudging the surface.
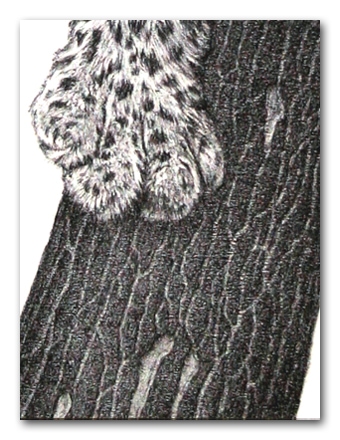
With the random shapes marked down I could shade one side of each piece of bark to make them 3D.
The shadows on the right, are all on the right, and on the other side, they're all on the left. That's because the light is coming from behind me.
To create depth, I've outlined each piece of bark with a dark line where the shadow meets the light grove. Note that are no very sharp lines.
These are great tips: How to Create Depth in Your Drawing: 7 Expert Techniques
Where I've removed some bark, I have erased the mid-tone. I've lightened the edges to the right and darkened the edges on the left side.
The smaller tree limbs are smoother in texture, but you can see how I've drawn gashes and wounds into the bark by using the same high contrast technique. They are dark lines with white ridges, for want of a better way to describe them.
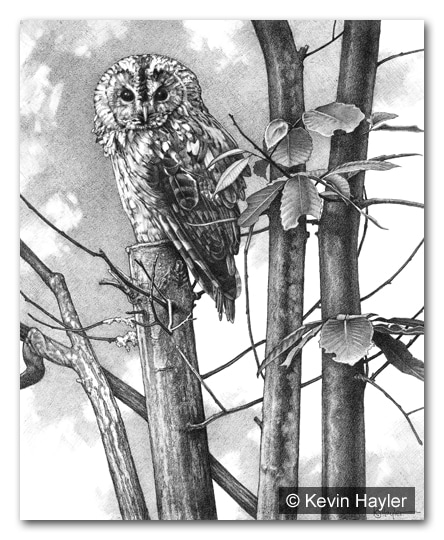
You can see the same technique in this drawing of a tawny owl sitting in a tree. The highlights and lighter patches along the main trunks were lifted out by gently brushing with them with a Kneadable Eraser (affiliate)
The scaley patches on the left branch were created by pinching the putty eraser and rolling it along the stem. I drew around the marks and created the crusty texture.
3. How to Draw Textured Backgrounds
I find drawing textured backgrounds quite challenging, and that's because I have a tendency to obsess with detail and produce tight drawings. This habit conflicts with drawing in a loose and interesting way, hence my backgrounds can appear stilted.
The two styles are so at odds that they are difficult to combine.
Ideally, I should sketch the background first. This almost never happens. I spend days on the detail and try to add a textured background at the end, by which time, I'm so afraid of ruining the drawing I can't risk any flourishes.
I know what I should do. I should block in all the tonal work and cover the whole picture from the start. I should flip between areas and build up every area of the drawing in gradual stages. I should never add detail too early.
It's a mistake to distract myself with detail early on, and I know it's a mistake even as I succumb to weakness and do it anyway!
Drawing a sketchy background is only practical when it's laid down in the sketchy stage. To backtrack, as I tend to do, not only takes more time, but it also tends to look less assured. I end up contriving the spontaneity with varying degrees of success.
Try these hacks: How to Make Your Drawings Interesting: 14 Ways to Improve a Drawing
The Tawny Owl above has a shady background but it's a perfect example of adding the background as an afterthought. I drew a very smooth and controlled tone and erased the edges with a kneadable eraser to give the impression that it was random – it wasn't.
I shaded and erased several times before settling on the final look. Even now I look at it with disappointment.
I drew another owl and again the textured background was far too timid. In the end, I was so annoyed that I drew over it.

My textured backgrounds are usually made by cross-hatching. It's random but within a set of guidelines. You can see the hatching lines and how they criss-cross. I like to vary the angles and draw each patch side by side.
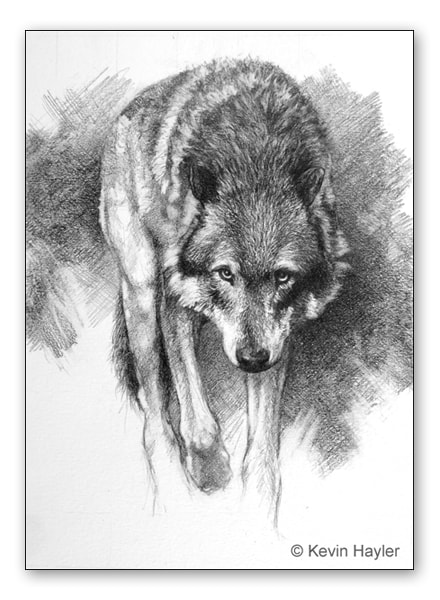
The wolf drawing above is far more successful. The shading has life. The technique was the same but this time I managed to refrain from drawing everything in detail. The result is far more pleasing to the eye.
The hatching is textured with eraser dabs plus a few swipes to break up the edges.
I can take cross-hatching to the extreme and use it to lay a super flat black background. Very few artists use this technique. It's time-consuming but the silky speckled texture is wonderful.
I use cartridge paper taped to a very hard surface. I have an acrylic plastic sheet. You must have a hard support to bring out the paper texture.
I use a 0.3mm Pentel Mechanical Pencil (affiliate)
If you are not using these already: Can You Draw With Mechanical Pencils? Yes, and Here's How
Starting on one side, hatch diagonally in one direction across the paper in one continuous tone. It doesn't matter if there are some anomalies because they will get covered up as you go back in the opposite direction.
Start with an HB or B and go back and forth, in layers, until you reach the darkest tone. Do not press hard. If the tone is still not dark enough go over it again with a 2B.
Any blotchy errors along the way can be corrected by brushing the surface with a stringy strand of Blu-Tak. Just enough graphite will lift to smooth the blemish away and make it disappear.

This takes time and a very steady hand. Most people will get too frustrated and give up, but if you have the patience you will create a textured black background that has 'zing'. There is no other way to draw texture with that speckled effect.
One last way to draw texture is to shade a background area with a soft pencil, something like a 6B, and erase it again with a Kneadable Eraser (affiliate). It will not remove all the graphite. The grainy stain will remain, especially around the edges of your detailed drawing.
It gives your drawing atmosphere.
Hey, if this post is useful, have you ever thought of turning your hobby into a business? This guide will show you how.

If You Want to Sell Your Art
Check this out!
Psst…it's only $12.99!
4. Drawing Grass Textures
I use two methods to draw grass texture, in-focus, and out-of-focus. The out-of-focus method gets the most reaction.
I look at photography to get my ideas. When a photographer zooms in on a subject it tends to blur the surrounding features. The subject stands out as the only element in focus.
I use the depth-of-field method to draw grass that was either never there or was there in detail, but I decided to 'lose' it.

The tiger was an early attempt to use depth-of-field in a drawing. I only drew the tiger's head in detail.
I shaded in the background with a 3B Derwent Graphic Pencil (affiliate). I spent very little time drawing the tiger so I didn't feel precious about the work. I felt liberated to draw freely and experiment.
When the background texture was roughed in, I took a Kneadable Eraser (affiliate) and rolled it into a ball, and swiped random dashes in the foreground.
I had no references. This was all guesswork.
The eraser removed the streaks with a soft edge making them look like out-of-focus grass stems. I had to calculate the width of the grass I also had to guess the tone. I did know that the closer stems had to be larger and more blurry.
I drew this image over 20 years ago, and in hindsight, I should've toned down the grass. Plus the dashes are too small, if I did it again I would correct both.
The smaller leaves were made by pressing a knob of Blu Tack (affiliate) into the graphite. I drew the single grass stems by placing two pieces of paper together and rubbing out the line between them.
I used very basic drawing techniques and it just goes to show that you really don't need any fancy kit or tricks to draw texture and get an acceptable outcome.
Drawing grass in focus simply means drawing each stem individually. The easiest way to get convincing grass is to draw a background and erase crisscrossed lines with an eraser pen.
There's no need to copy grass exactly, you can copy the style and run with it.

Look how I've drawn hay in this drawing. This is a detail that shows my method. I shaded the ground and drew in the hay piecemeal. Some stems I drew in, and some I rubbed out. You can also see how the stems are weaving over and beneath each other.
The darkest darks are in the gaps between the stems. The ground is in full shadow and you need that contrast to create depth.
The stalks also cast shadows. Where they touch, the shadow appears darker. Where there's distance, the shadow appears lighter and less defined.
If you want to know: How to Draw Realistic Shadows in Pencil (All The Best Secrets)
There are very few straight lines to be seen. You can see how the grasses are in fact, all shapes and sizes, they bend, twist, and kink.
I had my own reference photos, but this drawing was a montage of different images stitched together. The hay was mostly improvised.
This will interest you: Is Drawing From Reference Photos Bad? Are You Cheating?
5. How to Draw Fur and Hair Textures
Let's face it, drawing the texture of fur is a nightmare. The theory is simple but putting the theory into practice can be hit and miss. I find drawing long black fur with a sheen to be the hardest texture to get right.
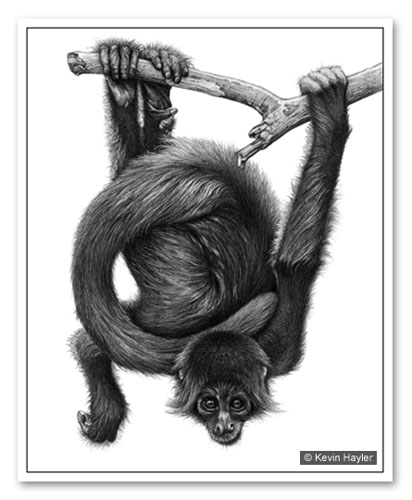
The rules are simple. You draw crisscrossed lines in the direction of the fur growth, regardless of its length. That's it in a nutshell. That's how I drew the spider monkey above.
The difficulty is in adding depth. Some lines must be darker than others if the fur is to look real. You'll notice that some of the darks tend to make small triangles where two strands of fur meet.

Some triangles appear by serendipity as the fur lines cross. Others appear when you lighten random areas with a Tombo Mono Eraser Pen (affiliate). You have to use your imagination to some extent.
Shorter fur is drawn in the same way, by crisscrossing shorter lines. I created texture on the monkey's head by stippling the top with Blu-Tack.
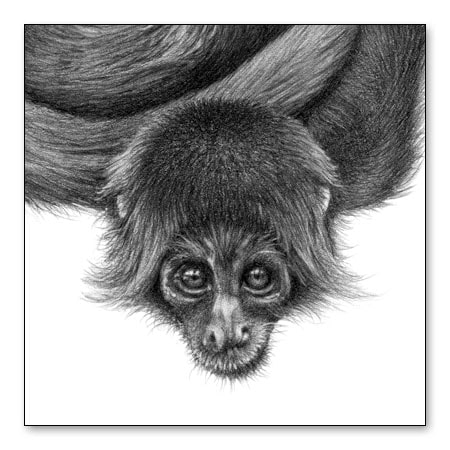
The eyebrows were flicked out using the sharpest edge of a Tombo Mono Eraser (affiliate). The hairs in the top lip were picked out using a Jakar Battery Eraser (affiliate).
If after doing everything you can to make the fur texture to look realistic, and it still lacks something, it's often the stray hairs that are missing.
Look at the chin and side-whiskers on the monkey's head. There are dozens of whispy hairs sticking out. These small touches are all that were needed to make the fur look real.
I'm going to mention one more technique that works if you do it right but is ruinous if it goes wrong.
You can draw fur by indenting the surface of the paper using a blunt point or indenting tool (affiliate). You draw the fur lines by following the growth pattern as if you were using a pencil. With the paper scored by dozens of tiny grooves, you use the side of your pencil to shade over the top.
The indents remain pure white and stand out against the shading. The effect is immediate, sharp, and looks impossibly complex. As far as I know, there's no other way to get such razor-sharp white lines.
The drawback, and it's a big one, is there is no going back if you change your mind. Once it's done, you have to live with it. You can't repair indented paper, so if you draw a wonky line you're in trouble. The best you can do is to draw inside the grove with a very sharp pencil and try to disguise it.
This post explains: How to Draw White Lines in a Pencil Drawing (Without Going Mad)

I used the indented texture technique on the hogs back above. I used a toothpick to make the grooves. You can use any point as long as it is clean and not too sharp. If you don't want pure white lines you can use a 9H pencil to indent the paper instead.
This trick works, but in truth, I seldom use this method anymore. I prefer to use a battery eraser (affiliate) for drawing thin white lines, that way I can erase and repair anything.
There is another way of drawing hair and fur which is much quicker and arguably more effective.
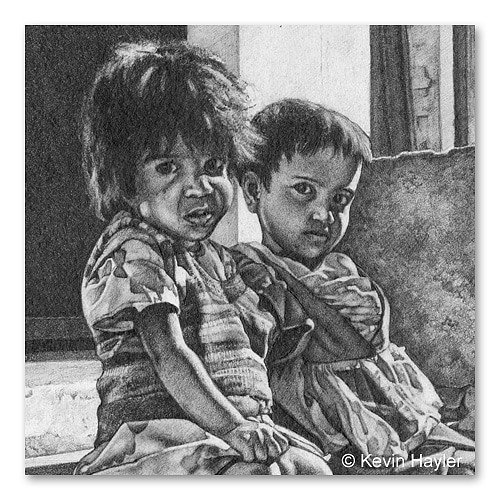
This is a detail of two Indian kids I drew way back in the early '90s. It was drawn on very fine-grained cartridge paper. I didn't even attempt to draw strands of hair. There was no point. I blocked in the shape and with a few flicks of the putty eraser, the hair looks fine.
I seem to have lost the knack of abbreviating my style in the last few years, something I'm determined to remedy.
If you want a good visual tutorial check out this class on Skillshare by Chris Petrocchi (affiliate). I checked out the other classes and this one was better than most, on Skillshare at least. Curiously, he only has 229 students, probably because his advert is poor.
I like these quick techniques: How to Draw Faster: 14 Expert Tips For Sketching at Speed
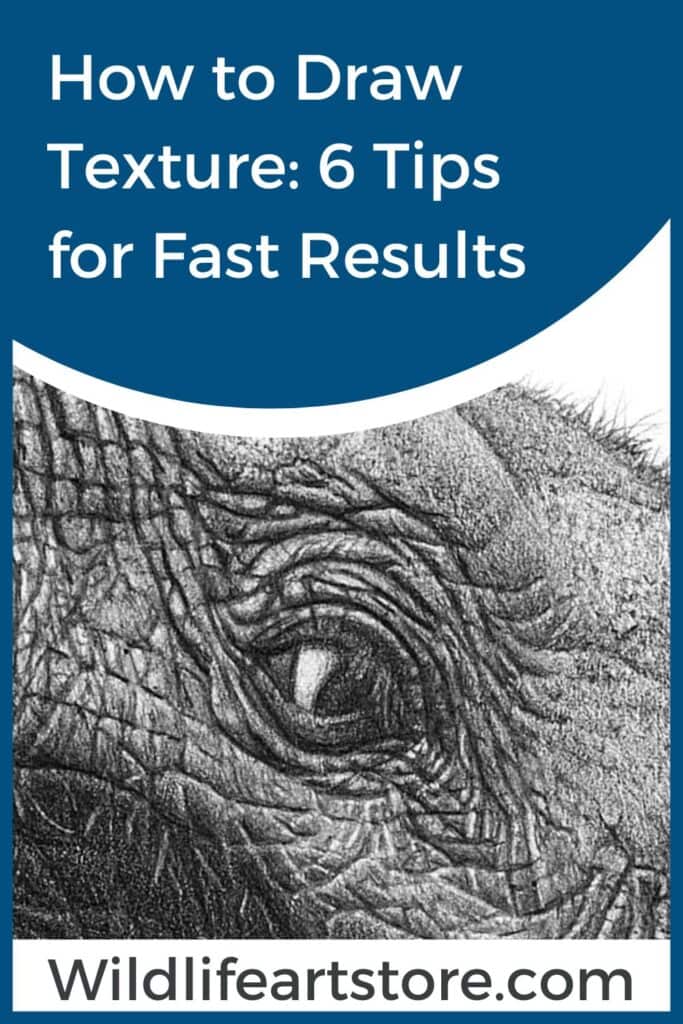
6. Drawing Wrinkly Skin Texture
I'll use the leathery texture of elephant skin to demonstrate this last technique, but the same principles apply when drawing creases and wrinkles with any subject.
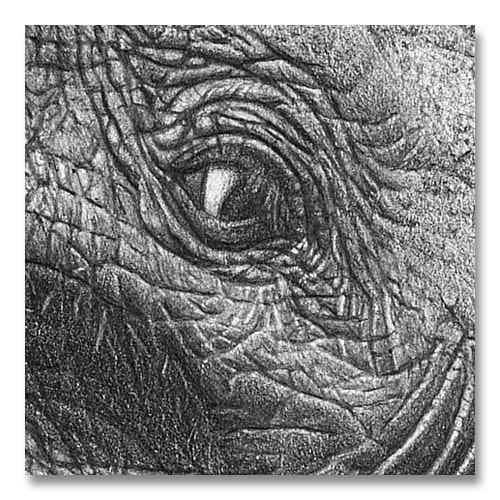
Drawing a wrinkle is straightforward. First of all, you draw the line. Then you figure out where the light is coming from, in this case, it seems to be from above.
The space adjacent to the dark line reflects the light, so you have light against dark. A smooth transition blends away from the light strip and into a mid-tone and darkens into the next wrinkle line.
You can erase the wrinkle highlight with an eraser pen or draw around it if you're a glutton for punishment. If you need a clean line, use the sharpened tip of a battery eraser. If you chose to indent the line, you'll get a sharp white edge with no transition.
There's no difference when drawing human wrinkles, the method is the same, only the smoothness is different. Human skin needs more finesse and more subtle blending. Use a paper blender, smoother paper, or harder pencils.
The leathery skin texture on the elephant's hide is all due to the paper grain. Everything was drawn with 0.3mm Pentel Mechanical Pencils (affiliate) and a steady hand.
7. Drawing Texture with Rubbings and Gimmicks
I've read other blogs and they talk about taking rubbings over wood and brick and using crumpled paper and sponges to press on the paper, but in all honesty, they have little practical application.
Most gimmicks don't work very well. Stick to using erasers.
All you have to do is be consistent. If you are hatching in one direction don't spoil the effect by getting lazy and losing the line
It doesn't matter if you crosshatch with diagonals or crosses. It does matter how you hatch.
The lines should be roughly parallel and equidistant. Imperfections are fine but a mish-mash of lines will always look amateurish. If you want to hatch in a random zigzag pattern, be neat and tidy. Scribbling seldom works.
Smudging is fine, but don't use your fingers. It's all too easy to leave a grease stain on your paper. Use a paper blender, a soft brush, or even a cotton bud (affiliate links). Experiment with them. Try tissue paper, cotton wool, and chamois leather (affiliate) too. They all blend graphite.
If you want to: Prevent Your Drawings From Smudging: The Ultimate Guide
Drawing Texture – Final Thoughts
You can draw textures using very basic art materials. There are no magic wands, no secret sauce, it's just application and practice.
These techniques help you to draw texture with a pencil but they're not a substitute for good drawing. You must get the proportions, perspective, and composition right first.
Now you've read this and got a few ideas, get your kit ready and start experimenting.
You'll soon be drawing texture like a pro.
If you like the way I draw and want to try things for yourself, this is my basic kit: (Amazon affiliate links)
- 0.3mm Pentel Mechanical Pencils
- Derwent Graphic Drawing Pencils
- Daler-Rowney Heavyweight Cartridge Paper
- Jakar Battery Eraser
- Tombo Mono Eraser Pen
- Faber Castell Kneadable Eraser
- Blu Tack
- French Box Easel
Now you're brimming with ideas, what about selling your work too? If you are stuck and don't know what to do, I can help. Just take a look!
If You Want to Sell Your Art
Check this out!
Psst…it's only $12.99!
You'll enjoy these posts too. Check them out:
- Drawing Prompts: 55 Useful Ideas, Techniques, and Exercises
- How to Draw Water: The Rules, Images, & Pro Hacks
- Do You Need to Outline Drawings? YES and here's why…
- How Do You Learn To Draw? 5 Tips To Get You Started
- Tracing Art – Is It Good or Bad? When Is Tracing Cheating and Is It Ever OK?
- What's the Right Paper for Pencil Drawing? (How to Choose Wisely)
PIN IT AND SAVE IT
Source: https://www.wildlifeartstore.com/how-to-draw-texture-in-pencil/
0 Response to "How to Draw a Tree Bark Texture"
Post a Comment